I would like to involve you to learn how we can allow our users to log in across multiple Salesforce orgs using single sign-on (SSO) credentials.
Let’s take a look into the advantages of having single sign on.
- We spend less time managing passwords.
- Our employees save time when they don’t have to manually log in to Salesforce.
- More people use Salesforce. Users can send out links to Salesforce records and reports, and their recipients can open them in a single click.
- We can manage access to sensitive information from one place.
Salesforce offers the following ways to use SSO.
- Federated authentication using Security Assertion Markup Language
- Delegated authentication (Integrate authentication with your LDAP server or use a token instead of a password for authentication)
- External Authentication providers- Salesforce uses the user’s login credentials from the external service provider to establish authentication credentials. (Google, PayPal, and LinkedIn)
Here we are going to discuss about Federated authentication using SAML.
SSO follows a hub-and-spoke architecture. At the center is a centralized authentication hub, the identity provider. The identity provider validates credentials and asserts the user’s identity to the spokes—Salesforce orgs that are the service providers. The org that is the identity provider generates SAML assertions that follow the SAML 2.0 standard for SSO.
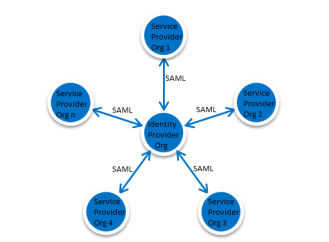
Follow the below sequence of steps to enable single sign on.Let us configure one org as an identity provider and another org as a service provider in our example.
Prerequisite:
Enable and deploy a My Domain subdomain in both Salesforce orgs.
From Setup, enter My Domain in the Quick Find box, and then select My Domain. Deploy the subdomain to the org’s users.
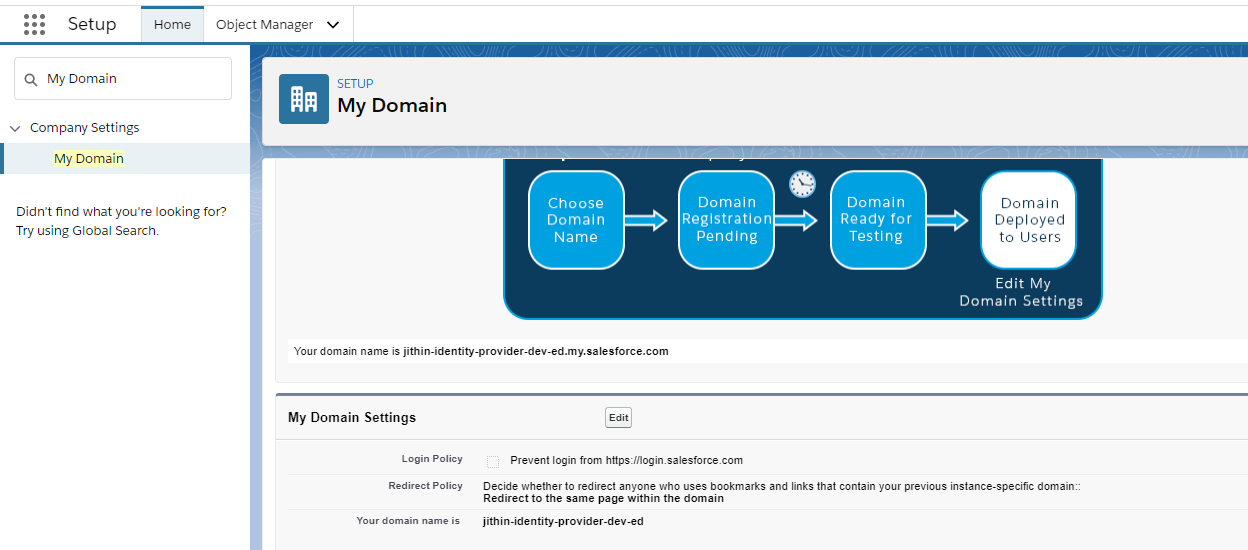
Identity Provider Org
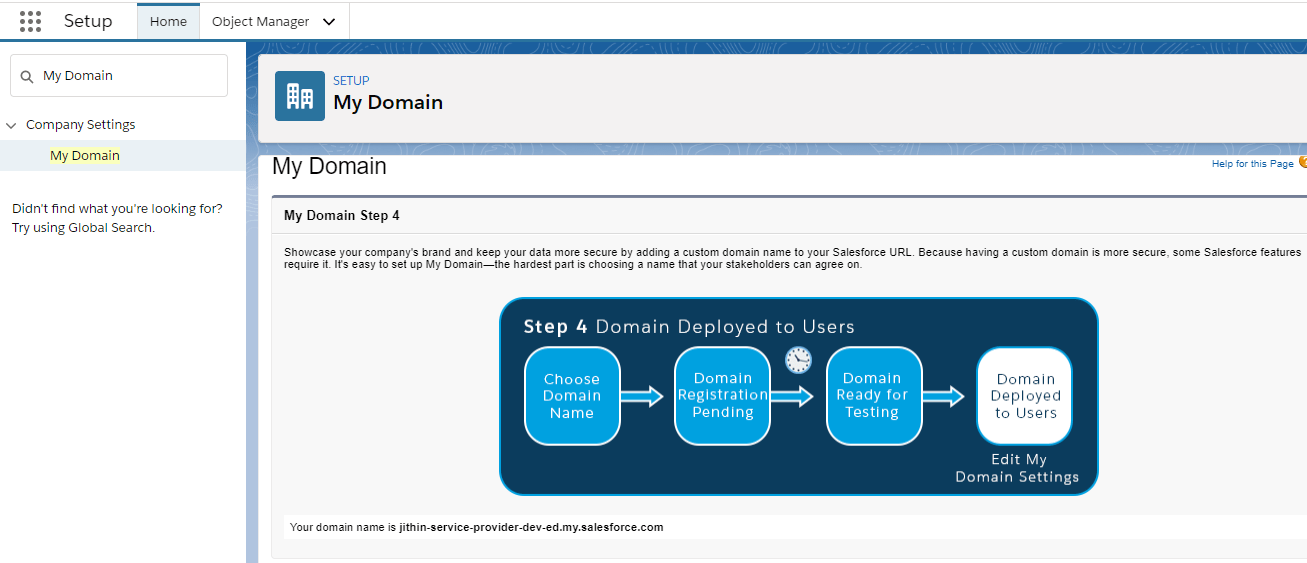
Service Provider Org
Identity Provider Org Configuration Steps:
By default, Salesforce enables your org as an identity provider when you create the My Domain subdomain.
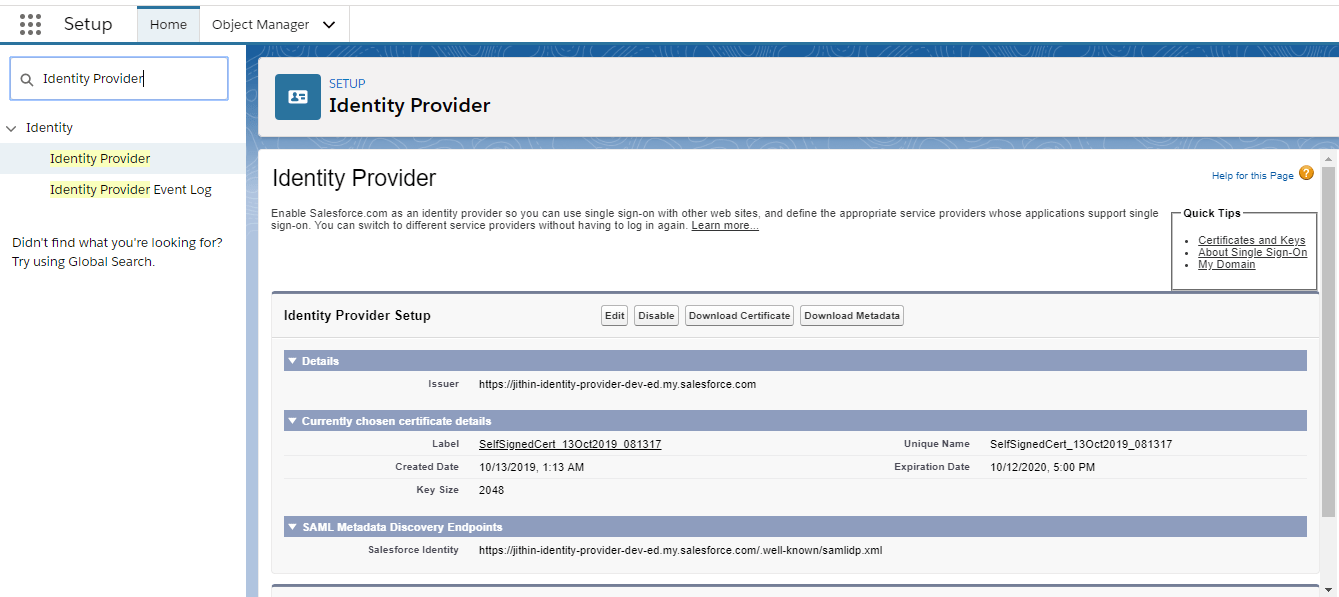
To verify that your org is enabled as an identity provider, from Setup, enter Identity Provider in the Quick Find box, and select Identity Provider. If the org is not configured as an identity provider, click Enable Identity Provider.
Download a certificate from your identity provider. Service provider org uses a certificate to establish trust in the identity provider. If previously we haven’t generated a certificate and key pair, when Salesforce enables an identity provider, it creates one. Optionally, we can pick an existing self-signed certificate or use a CA-signed certificate.
Copy the Salesforce Identity URL listed under SAML Metadata Discovery Endpoints on the Identity Provider page. We can use this URL in the next step to import SAML metadata when we configure SAML SSO settings on the service provider. Alternatively, to capture metadata in an XML file, click Download Metadata.
Service Provider Org Configuration Steps:
Import metadata from a URL for the identity provider org. Alternatively, enter the SAML 2.0 settings manually, or import a metadata file with the settings.
- From Setup, enter Single Sign-On Settings in the Quick Find box, then select Single Sign-On Settings.
- Click Edit. To reveal the SAML SSO settings, select SAML Enabled. Save the change.
- Under SAML Single Sign-On Settings, click the appropriate button to create a configuration.
- New—Specify all settings manually.
- New from Metadata File—Import SAML 2.0 settings from an XML file from our identity provider. This option reads the XML file and uses it to complete as many settings as possible.
- New from Metadata URL—Import SAML 2.0 settings from a public URL listed under SAML Metadata Discovery Endpoints on the Identity Provider page.This option reads the XML file at this URL and uses it to complete as many settings as possible. The URL must be added to Remote Site Settings to access it from our Service Provider Salesforce org.
- Complete the SAML settings that describe the identity provider. The metadata options populate most settings, making it easier to set up an org or community as a service provider. For example, the metadata populates the Issuer, Entity ID, and Identity Provider Login URL fields automatically with URLs for our identity provider.
Here am using the option New from Metadata File (We downloaded it already from Identity provider Org).
We have to select the Identity Provider Certificate which was downloaded from our Identity Provider Org earlier.
To manage SSO effectively across multiple Salesforce orgs, specify federation ID as the SAML identity type.( Assertion contains the Federation ID from the User object)
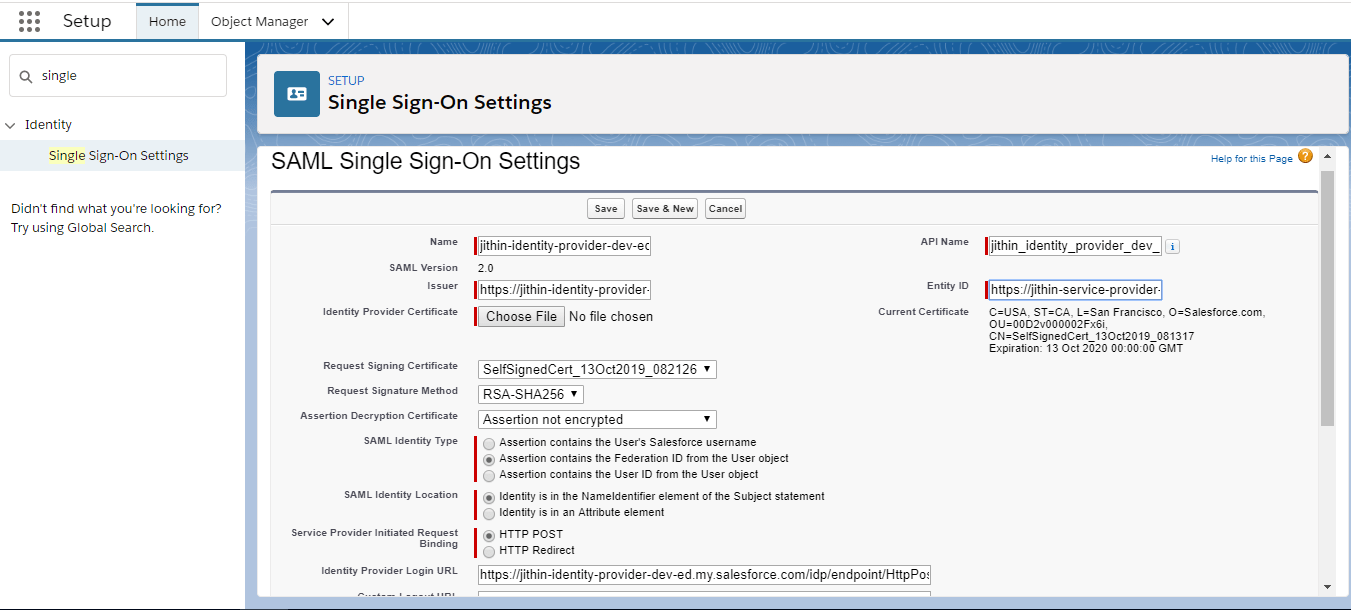
After completing the settings, save them. From this page, copy the values from the Entity ID and Identity Provider Login URL fields. We need these values later to define a connected app on the identity provider.
On the service provider, add the identity provider as an authentication service. From Setup, enter My Domain in the Quick Find box, then select My Domain. Under Authentication Configuration, click Edit and select the authentication service for our identity provider. Save the settings.
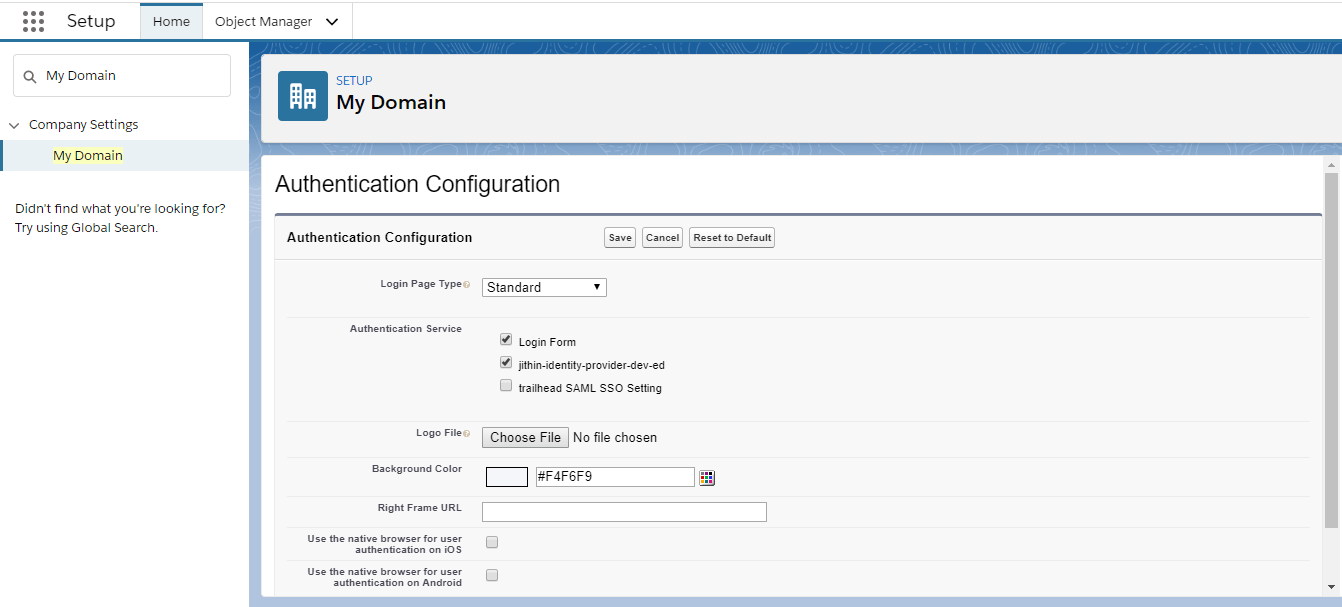
To define other orgs as service providers, repeat these steps.
On the identity provider org, Create a Salesforce connected app.
Use the New Connected App wizard to define a connected app.In Lightning Experience, from Setup, enter App in the Quick Find box, then select App Manager. Click New Connected App.In Salesforce Classic, from Setup, enter Apps in the Quick Find box, then select Apps. On the page under Connected Apps, click New.
- We need Entity ID and Login URL values from our service provider org to configure settings for the connected app. Under Web App Settings, click Enable SAML. For Entity ID, paste in the Entity ID from the SAML SSO settings. For the ACS URL, enter the saved endpoint Login URL. To map user identities across multiple Salesforce orgs, specify Federation ID for the subject type. Save the settings.
- To select the profiles and permission sets allowed to access this service provider, click Manage on the connected app page. Select Manage Profiles or Manage Permission Sets. Add the profiles or permission sets for users who can access this app.
- When complete, Salesforce lists the new service provider on our identity provider’s list of connected apps.
- To define connected apps for other service provider orgs or communities, repeat these steps as needed.
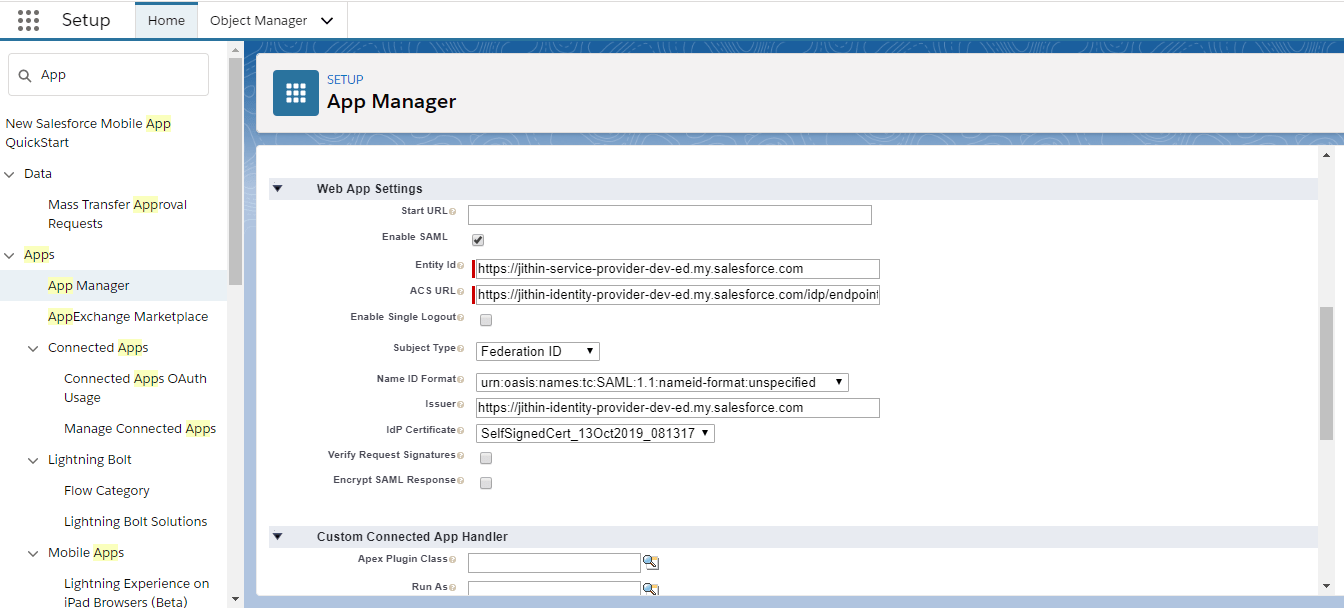
Test the SSO implementation.
- Create a test user in our identity provider org, and set the user’s federation ID to a unique value. Make sure to assign the user a profile that has been granted access to our service provider.
- Create a test user in our service provider org, and set the user’s federation ID to the same value as your test user in the identity provider. This action binds the two accounts together.
- Log out from both orgs.
- Enter the My Domain URL of the identity provider org into browser, for example,https://jithins-identity-provider-dev-ed.my.salesforce.com.
- Log in to your identity provider org as the test user.
- Now, enter the URL of the service provider org into browser, for example, https://jithins-service-provider-dev-ed.my.salesforce.com.
We are redirected to the identity provider org. Because you’re already authenticated, we are redirected back to our service provider org. Cheers!!!!
Error Invalid HTTP Method Oops!!!
Anyone got error stating Error Invalid HTTP Method ?

Lets look into what might have gone wrong here..
You may get an error like Single Sign-On Error as shown below- Error Invalid HTTP Method if you choose Service Provider Initiated Request Binding as HTTP Redirect instead of HTTP POST while configuring SAML Single Sign On Settings, just bo back and verify the settings.
Use HTTP POST and its corresponding endpoint url in both orgs (Identity Provider Login URL and ACL URL-Connected App configuration which follows in later part of the configuration)
'기타 보관함 > 개발자정보' 카테고리의 다른 글
| Salesforce ADM-201 Exam Actual Questions (0) | 2022.04.16 |
|---|---|
| Custom Dependent Picklist In LWC (0) | 2022.04.16 |
| 로컬 컴퓨터에서 LWC 개발 (0) | 2022.04.16 |
| Lightning Context 현재 사용자의 세션 ID를 가져오는 방법 (0) | 2022.04.16 |
| 나의 첫번쨰 Lightning Web Component (0) | 2022.04.16 |

